Media Pinball Editor
Download Media Pinball Editor - v1.5 - Last Updated on 7/3/2025
Our Editor allows you to quickly generate media animations from a DMD Dump.
To get started, you first need to obtain a DMD dump from your pinball machine.
Watch our 6 minute Media Pinball Editor - Capturing Start, End, and Scores video tutorial: an easy to follow guide on how to capture the start of a game, the game over scene and the scores of player 1 on real pinball machines with a DMD.
Get a DMD Dump
To get a DMD dump, you'll need to hook up your pin2dmd with an USB cable to your computer.
You'll need to download a tool called Pin2DMD.exe which can be used to extract DMD frames.
You can download this tool at: Github.com
To start the extraction, execute pin2DMD.exe and click the "Create Dump File" checkbox. You'll be requested to select a DUMP folder where this tool will automatically start dumping the DMD output.
Create your DMD Action Pack
Quick Overview
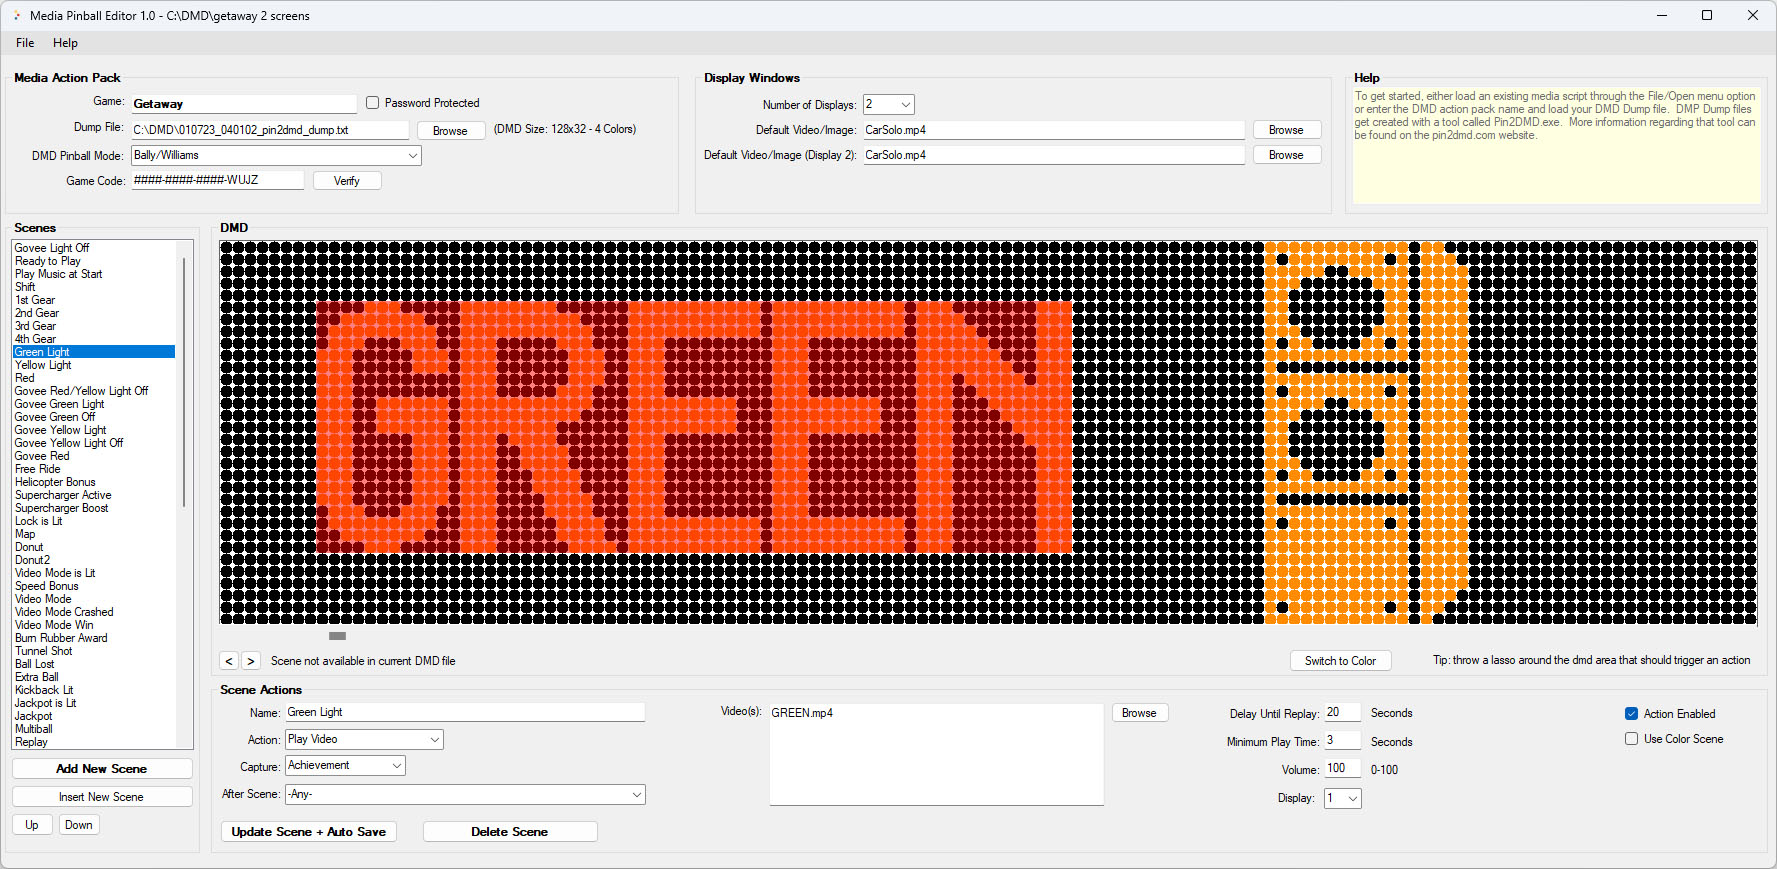
Once you've obtained a DMD dump file, you can get started with linking media to specific DMD frames. After you start our Media Pinball Editor, click the Browse button to load your DMD file.
If everything went well, you should be able to see the output of your DMD frames within our editor. Simply use the arrows to find the frame for which you want to invoke a trigger.
Before clicking the "Add Scene" button, make sure to only select the area of the DMD frame for which you want to invoke a trigger. The less you select, the quicker we can compare recording scenes with a live DMD.
After you've added a frame, make sure to link this frame to a video, picture, sound file, or a program.
Make sure to set the replay delay and minimum play time.
Repeat this process for all relevant DMD frames.
Don't forget to set the Default Video/Image we should be showing within our player if no scenes are being triggered.
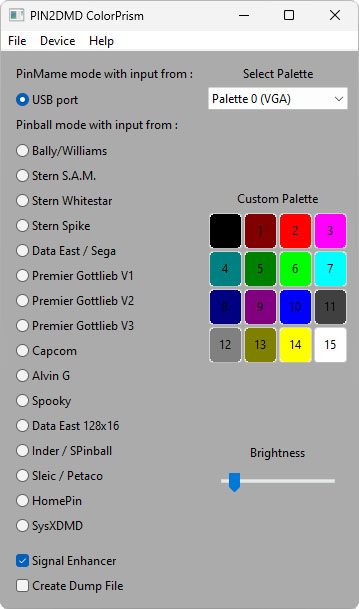
Next, make sure you set the DMD Pinball Mode. This is essence the machine settings you used to record the DMD Dump File.
Once you're done, select the File/Save menu option. When you select a game folder, make sure to select a new folder since all selected media will be copied over to that folder.
This folder will include all media you can then easily share with others.
Scene Actions
Name: Make sure every scene is named clearly since you won't just use the here within the editor, but also within our site to record XP and achievements.
Action: Select which action you would like to take: Play Video, Show Image, Play Sound, Run Command, No Media Action. You would select "No Media Action" if you simply wanted to record a scene for achievement purposes.
Capture: A scene either represents an achievement, the start or end of a game, or the capturing of the game score.
After Scene: If you want a scene to only trigger after another scene has been played. When capturing the score for instance, it might be possible that we first need to capture the Game Over scene.
Video(s): When you selected the "Play Video" action, you can select multiple video files for a specific scene. When playing a game, we will randomly play one of these videos.
Image(s): When you selected the "Show Image" action, you can select multiple image files for a specific scene. When playing a game, we will randomly pick one of these images.
Sound(s): When you selected the "Play Sound" action, you can select multiple mp3 sound files for a specific scene. When playing a game, we will randomly pick one of these sound files.
Command: When you select the "Run Command" action, you can select to Execute a Program or you can run a Govee Device (like smart bulbs or plugins). When you select "Execute Program", you can browse for the program you want us the execute, you can enter optional additional parameters and you can select the directory in which you want to execute the program in. If you select "Govee Device", you'll need to enter the Device Name, select the Command (Turn On/Off, Color RGB or Other) and you can also indicate to automatically turn off that device after a specified amount of seconds. This allows you to turn on a device when a certain DMD scene is playing and then automatically turn that device off after a short period of time. Actually linking your Govee devices is done in our Media Pinball Player where we will use entered device name with the actual available Govee devices on your account (see player for more details). While the manufacturer doesn't charge a fee to control your devices, keep in mind that they do limit the number of times you can control a device per minute (currently 10 triggers per minute).
Delay Until Replay: Enter the number of seconds before we can trigger this action scene again. This is to prevent a constant replya of the same scene.
Minium Play Time: The minimum amount of seconds we should show a scene before switching to a different one.
Volume: You can change the sound level between 0 and 100 where 0 is the same as muting the sound.
Action Enabled: If for some reason you don't just want to delete a scene but still want to disable a scene, you can simply uncheck this flag.
Use Color Scene: It is recommended to record all your scene in monochrome since DMD's often change colors but in some cases that simply isn't possible.
Capture Options
Achievement: Every scene is also recorded as an achievement. This allows us to record XP and achievements for players. You can manage XP and achievements on our web site. Log into your account to make changes to these settings.
Start Game: It is important to record the Start of a game so we can keep track of the activity of the player.
Game Over: Recording a "Game Over" scene allows us to keep track of the end of a pinball game.
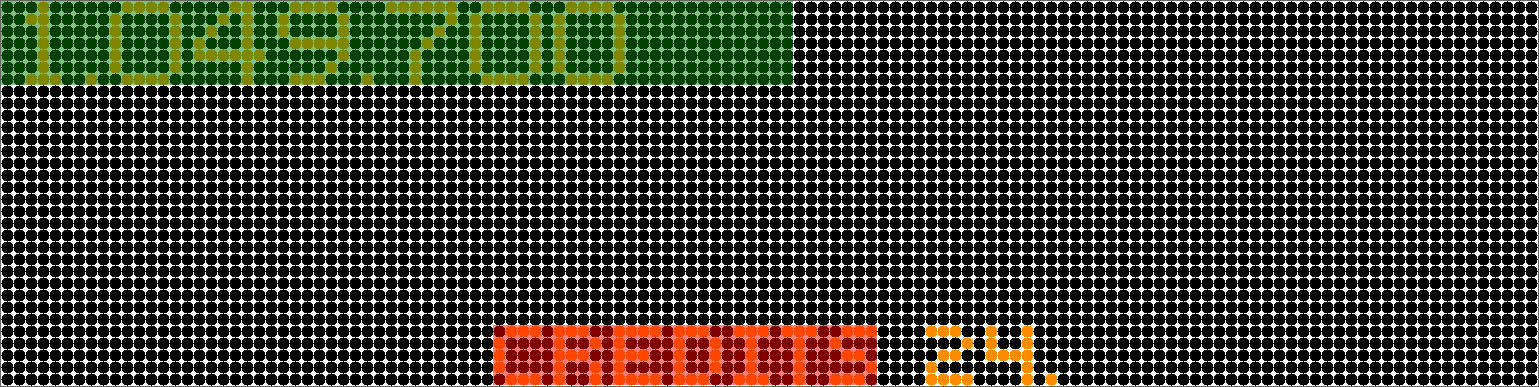
Score: Before capturing the score for "Player 1" (the only player supported at this time), make sure to select the area on the DMD that we need to use to trigger this scene. In the above example we won't try to capture the score until we see the text "CREDITS" in that exact position. If the text "CREDITS" shifts depending on the number of credits left, we might need to add additional scoring scenes to capture every possible scoring trigger.
While not showing in the screenshot above, we also use "After Scene" trigger mechanism since we don't want to try and capture the score until after the "Game Over" scene has been triggered.
To capture the score, we need to select the area where the score for Player 1 will appear. We can do so after we click the "Player 1" button. When capturing this area (see screenshot above), don't forget to select the entire area where we could possibly see the player 1 score shown. Once done, click the "Test Score Capture" button to see if our server can translate the score in actual numbers with our AI score detection tool.